Peacock
Peacock is a graphical front end for the MOOSE input file syntax. Peacock allows the user to build or modify an input file, execute an application, and view the results, all within one package.
Environment
To allow the shell to find the Peacock executable, you must add its directory to your PATH environment variable. Within the MOOSE directory, the Peacock executable is located in python/peacock/. If for example your MOOSE directory is installed at ~/projects/moose, then you would add ~/projects/moose/python/peacock to your PATH. To avoid needing to manually modify PATH for each terminal session, it is recommended that you do this in your shell profile file. The shell profile file name and the syntax to modify environment variables differ by shell, so consult shell documentation for proper usage. To know which shell you are using, use echo $SHELL. The following table gives the profile file name and PATH modification syntax for each shell:
| Shell | Profile Location | Command |
|---|---|---|
| bash | ~/.bash_profile | export PATH=~/projects/moose/python/peacock:$PATH |
| zsh | ~/.zshrc | export PATH=~/projects/moose/python/peacock:$PATH |
| sh | ~/.profile | export PATH=~/projects/moose/python/peacock:$PATH |
| csh | ~/.cshrc | setenv PATH ~/projects/moose/python/peacock:$PATH |
| tcsh | ~/.tcshrc | setenv PATH ~/projects/moose/python/peacock:$PATH |
Usage
After you have added the Peacock directory to your PATH as described above, you can invoke Peacock in any directory below the directory containing your application executable. For example, if your project is located at ~/projects/myapp, and you built the binary ~/projects/myapp/myapp-opt, you can run Peacock in the directory ~/projects/myapp/test/tests/mytest/, and Peacock will be able to find your application:
cd ~/projects/myapp/test/tests/mytest/
peacock
This will load Peacock without any input file (which you can load afterward); alternatively, you can start Peacock with an input file directly from the command line:
peacock -i your_input_file.i
Do not use sudo when running Peacock.
Input File Tab
The "Input File" tab (shown below) allows you to create and edit input files. You can automatically load an input file by passing it as an argument on the command-line, or you can use the "Open" button on the Input File tab.
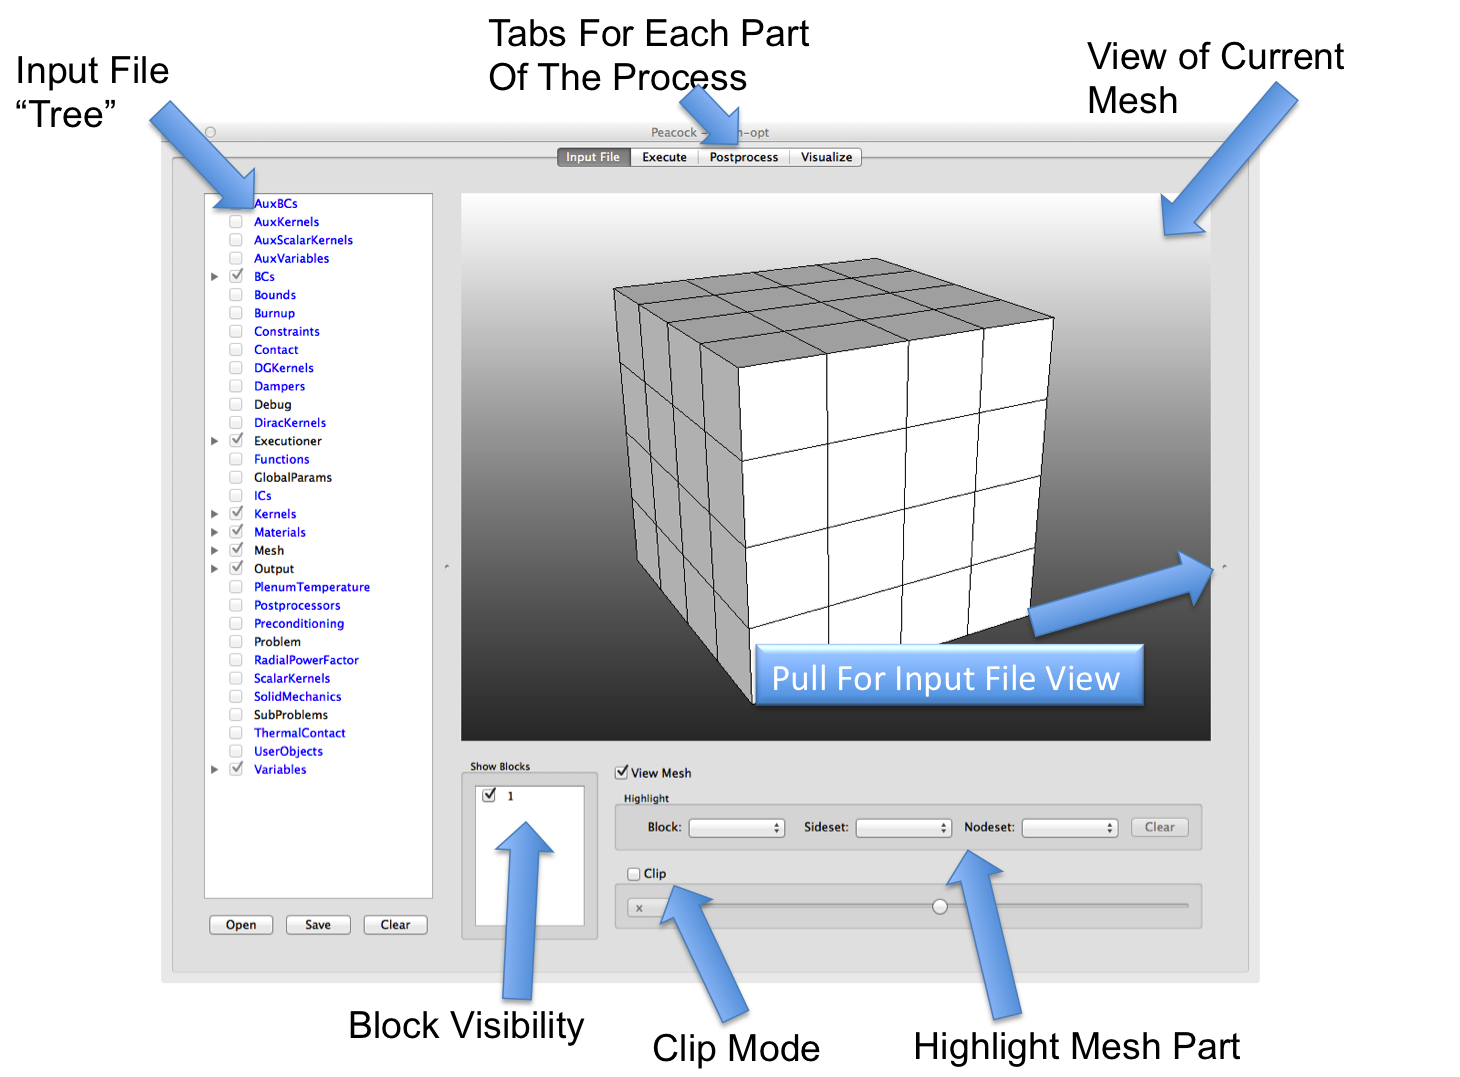
When Peacock opens, you will be presented with a "Tree View" on the left side of the tab. This tree view represents the input file syntax available to you for the current application. If you launched Peacock with an input file, the tree will already be populated with the blocks and parameters from that input file. You can click the "little arrows" next to an item to expand/contract that part of the tree.
Items that are BLUE can be right-clicked to bring up a menu where you can "Add" something to that part of the input file. For instance, to add a Kernel to the input file, I would right-click "Kernel" and then click "Add..." from the pop-up menu. After clicking "Add", a new window will open, allowing you to specify the parameters for the Kernel you want to add (See the Parameter Editor section below).
Items that are BLACK can be double-clicked to edit the parameters. For instance, to edit the Mesh section, you double-click the "Mesh" item, and the Parameter Editor will open (See the Parameter Editor section below).
Other possibilities with the tree view include deactivating items and deleting items. To activate or deactivate an item (i.e., add/remove it from the "active" list in the input file) simply check/uncheck the check box next to it. Deactivating whole sections will remove that section from the input file.
To delete an item, simply right-click on it, and click the "Delete" option in the popup menu.
When using an application that has a "Mesh" section, modifying the Mesh section to use an Exodus mesh or a Generated Mesh will cause a 3D view of the mesh to appear on the right-hand side of the Input File tab (see picture above). You can freely rotate (left-button-drag), pan (middle-button-drag or shift-left-button-drag) and zoom (right-button-drag) to view the mesh. You can turn on and off the drawing of the mesh itself (i.e. the element edges). Located below the 3D window are drop-down menus where you can select a block, sideset, or nodeset you would like to highlight. When you select one, that region will turn RED in the 3D view and all other geometry will go into wireframe mode. Click the "Clear" button to clear the highlighting selection.
Another way to highlight pieces of the mesh is to select items in the Tree View. If you select a BoundaryCondition item for instance, the sideset or nodeset where that boundary condition will be applied will be automatically highlighted in the 3D window. The same applies to any item that is restricted to a particular "block" of the mesh.
The final thing you can do with the Mesh View is activate "Clipping". Clipping will allow you to move a plane through your mesh, slicing through it to see inside.
To view the actual text-based input file generated by the current status of the Tree View, click and hold the slider that is on the extreme right side of the window and pull it to the left to uncover the Input File View. You cannot edit this window, it simply displays the choices you've made in the Tree View.
Finally, if you would like to save your current input file, you can click the "Save" button and input a filename. Note that the ".i" suffix will be automatically added for you (you can provide it if you want, but it's unnecessary).
Parameter Editor
With the Input File tab active, double-clicking to edit an item or right-clicking and selecting "Add..." for an item in the Tree View will cause the "Parameter Editor" window (shown below) to open. This window is where you choose what type of item you are adding and edit the parameters for that object.
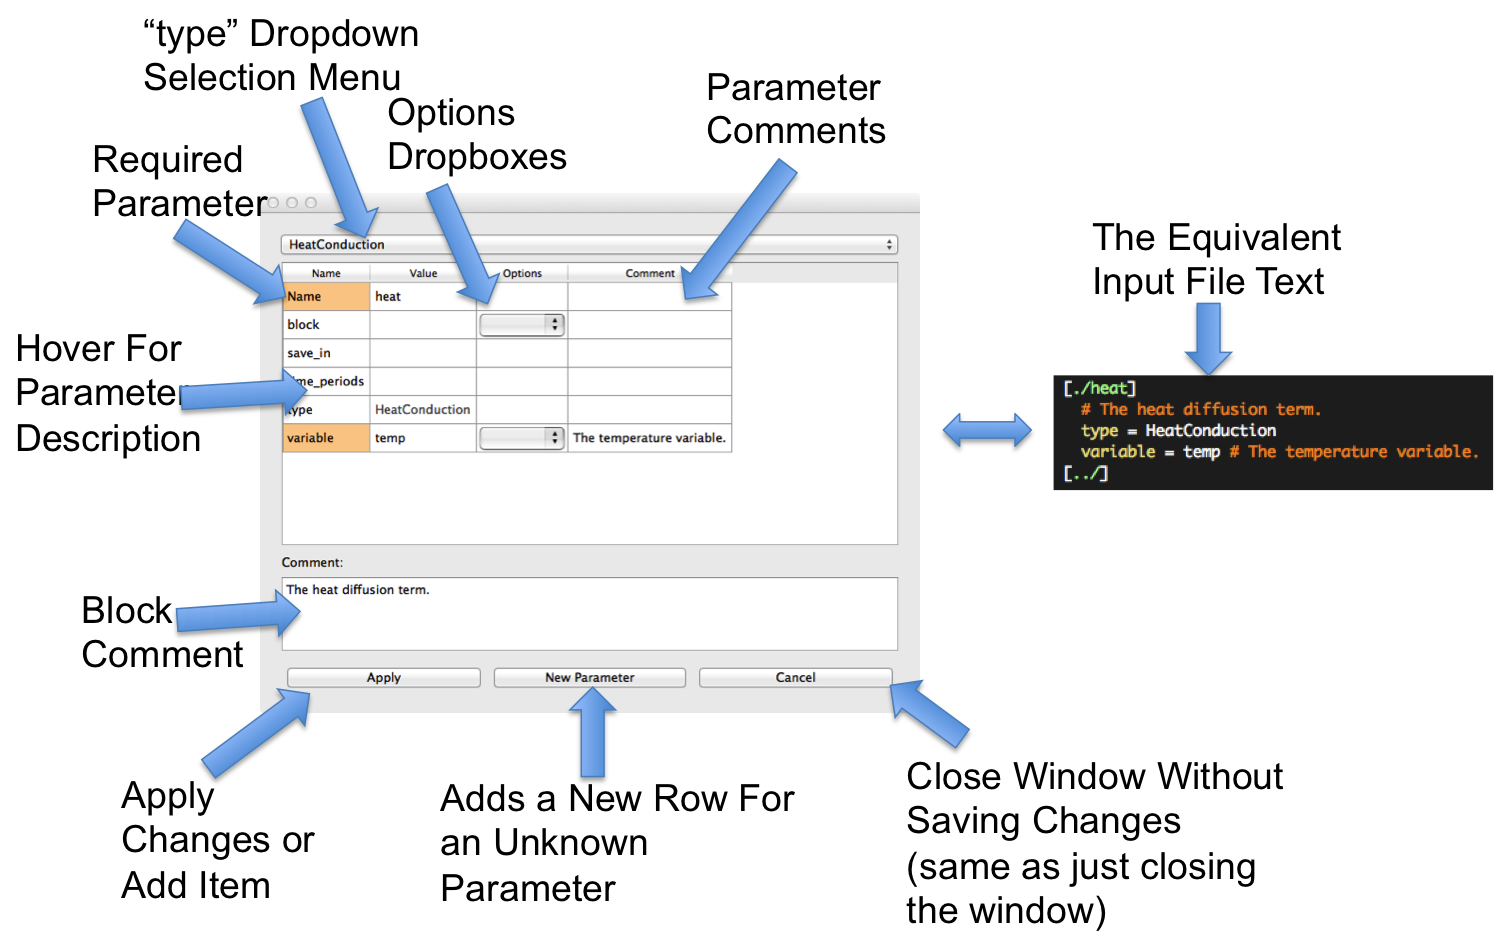
Selecting a type
The first thing you'll want to do in the Parameter Editor window is use the large drop-down menu at the top to select the type of object you are editing. Note that sometimes there are no options there and only an asterisk ("*") will be shown (such as when adding a Variable).
Parameter Table
After selecting a type, the Parameter Table will be filled with the possible parameters for that object, including: Name, Value, Options, Description, and any Comments associated with each parameter. Let's talk about each one of these columns in detail:
Name: This is the name of the parameter, i.e. the thing on the left side of the "=" in a text-based input file. This is not normally editable (the names are set for each parameter). Parameters that are Required will have the background for their name colored ORANGE. See the above image.
Value: Initially this will be filled with the default value (or current value, if editing an existing item) for each parameter. This is what you need to edit to change the value of a parameter. Note that boolean parameters have a drop-down menu in this column where you can select True/False. For vector parameters you do _not_ need to supply the single quotes around the space-separated values. It's OK if you do, but unnecessary.
Options: If Peacock understands the parameter, and can provide some helpful options for what the value of the parameter might be, then something will show up in the Options column for that parameter. For many parameters (such as variable names) a drop-down menu containing the names of other items in the input file will be in this column. Selecting something from this drop-down menu will insert that value into the Value column. If the parameter is of "vector" type (i.e. in the input file you would generally put the value for that parameter in between single quotes) then selecting things from the Options column will append them to the Value column. If the parameter type is not a vector, then selecting from the Options column will generally overwrite any existing value in the Value column. The Options column is used for other context-sensitive purposes as well. For instance, for "FileName" parameters, a button to "Open File" will be present in the Options column. Clicking this button will allow you to select a file from your system and the path to that file will be inserted into the Value column. In the future, applications will be able to customize the behavior of the Options column to make Peacock perform exactly as they wish for their users.
Comment: The comment column allows you to add a comment that is associated with that parameter. That comment will be saved to the input file if you use the Save button in the Input File tab. (Note: Do not use the comment character "#" here... it is automatically inserted by Peacock.) If you opened an input file with in-line comments after the parameters, those comments will be shown automatically in this column.
Block Comment
Below the Parameter Table is the Block Comment box. Any text entered into this box will be displayed as a comment at the beginning of the block in question (see the Equivalent Input File Text in the above image). You can use "newlines" to create a multi-line comment, comment characters are not required – they will be automatically inserted by Peacock.
Apply/Add Button
The button in the bottom left will either show "Apply" or "Add" depending on whether you are editing or adding an item. Click this button to save your changes.
New Parameter Button
The "New Parameter" button will add a new row to the Parameter Table. You can fill in the Name and Value cells of this new row to add a new parameter. You should not need to add new parameters often: this button exists for the rare cases in which Peacock does not know about a valid parameter for this object. This can occur in certain circumstances involving custom Actions.
Cancel Button
Close the window without saving any changes. This is the same as just clicking the close button on the Peacock window.
Execute Tab
The Execute Tab (shown below) allows you to run the current application with the input from the Input Filw Tab. You dont need to save the input file first. Just edit the appropriate fields in the Input File Tab, then go to the Execute tab and click Run!
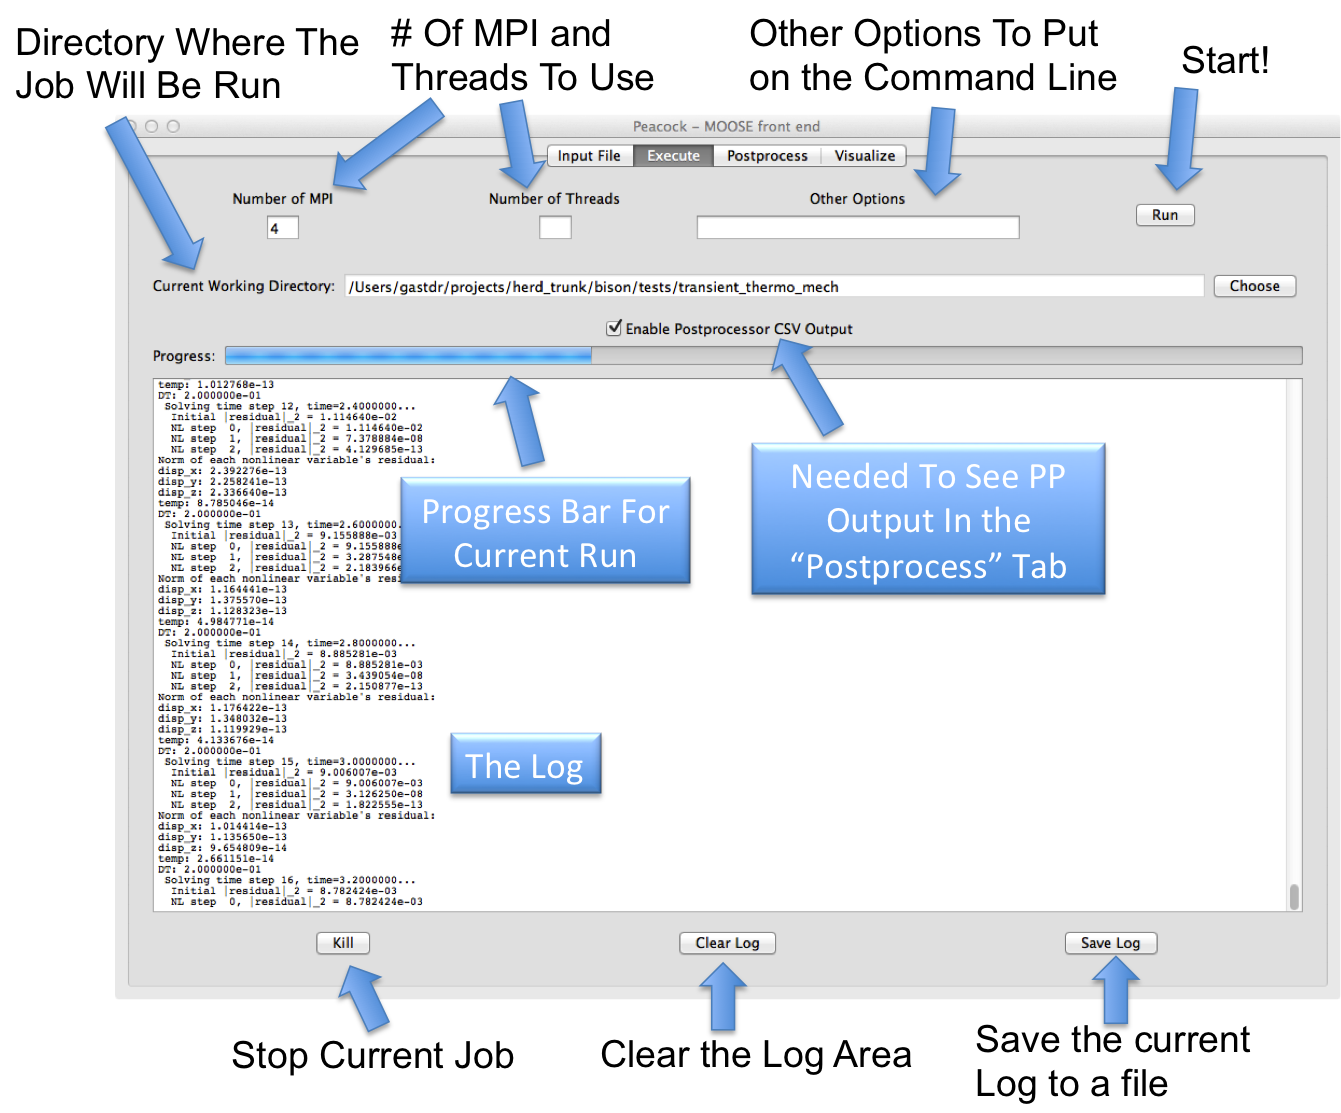
MPI and Threads
Allows you to run in parallel using combinations of distributed- and shared- memory parallelism. Leave both boxes blank if you want to run serially.
Other Options
Allows you to supply other command-line options that are simply appended to the command-line. You can pass PETSc-specified options here just like you can on the UNIX command line.
Run Button
Begins the execution of the application with the inputs currently defined on the Input File Tab.
Enable Postprocessor CSV Checkbox
This is enables by default. It causes a Comma Separated Value (CSV) file to be written with the Postprocessor values. That CSV file is necessary for the Postprocessor plotting tab to function.
Log Box
Shows the output from the execution of the application. This works similarly to console output in a terminal. If this window is scrolled all the way to the bottom, it will continually display the output from the currently executing run. If you scroll up in this text window, it will stop displaying new output (even though new output is continually being added to the bottom of the log).
Kill
Stop the currently running job.
Clear Log
Clear all the text from the log box.
Save Log
Save all of the current text to a file. Useful for providing extra information on Tickets/Issues.
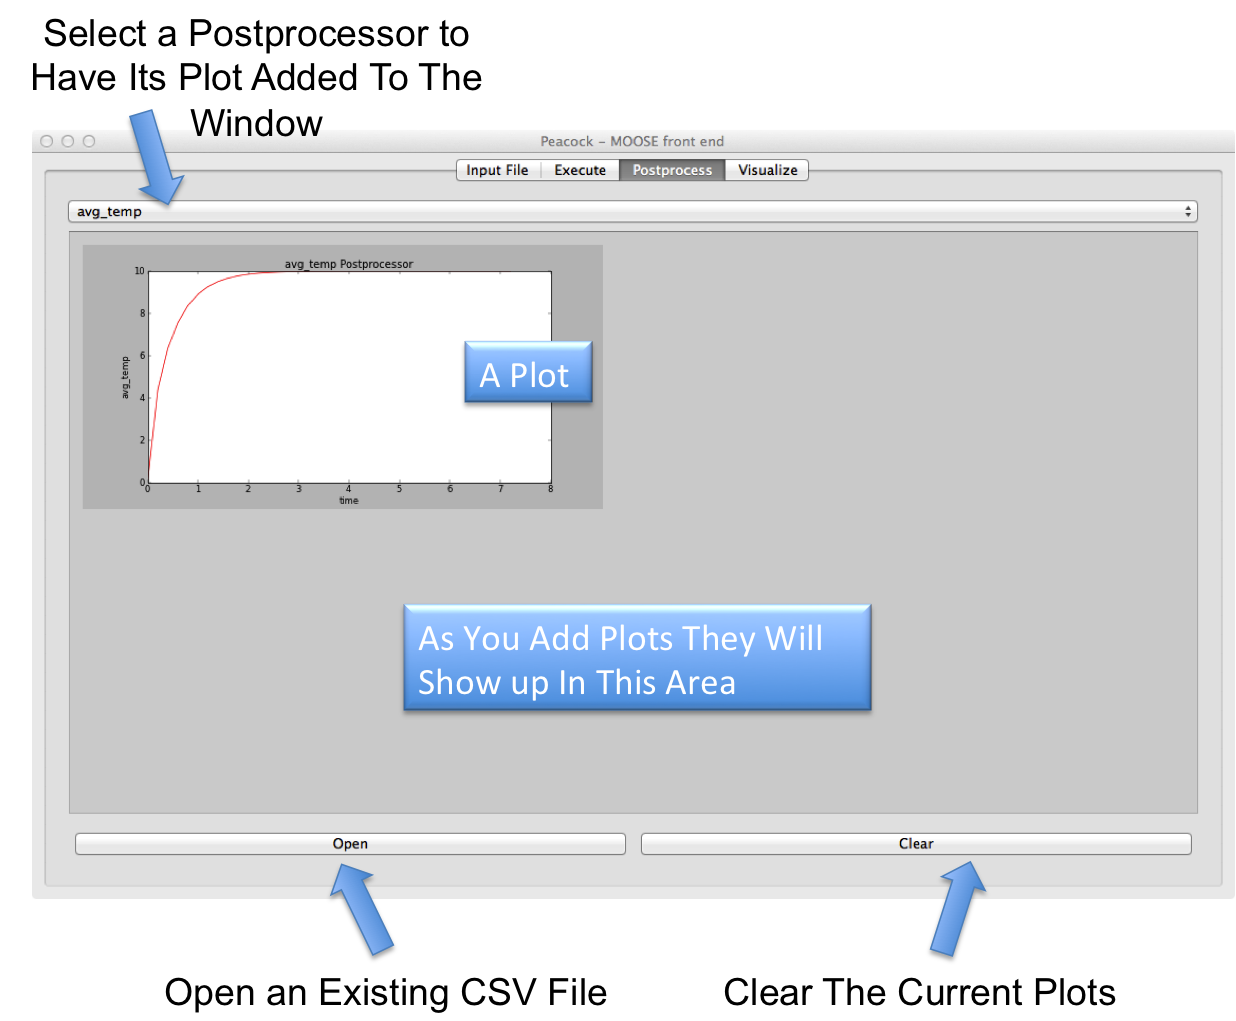
Postprocess Tab
The Postprocess Tab (pictured below) allows you to plot Postprocessor values live, while the code is executing. The large drop-down menu at the top contains a list of all of the currently available Postprocessors. Check one or more of these blocks, and plots for those Postprocessors will appear. The plot will update automatically as new information becomes available from the current run. The plots can be right-clicked to display additional options (to save a plot file, and change the plot colors). The Clear button will clear out all of the current plots.
Visualize Tab
The Visualize Tab (pictured below) is like a "mini Paraview" that allows you to view the results of your calculation live, while the code is executing. When you start a simulation on the Execute tab, the results will automatically start to show up in the Visualize tab.
The Visualize Tab is not intended to be a replacement for Paraview, Ensight, ViSit, or other fully-featured visualization tools. Instead, Peacock's visualization capability is a basic set of functionality that is useful while your simulation is running so you can quickly check on the status of the simulation. Some new visualization capabilities may be added to Peacock over time, but in general, users should rely on one of the tools mentioned previously for more advanced visualization needs.
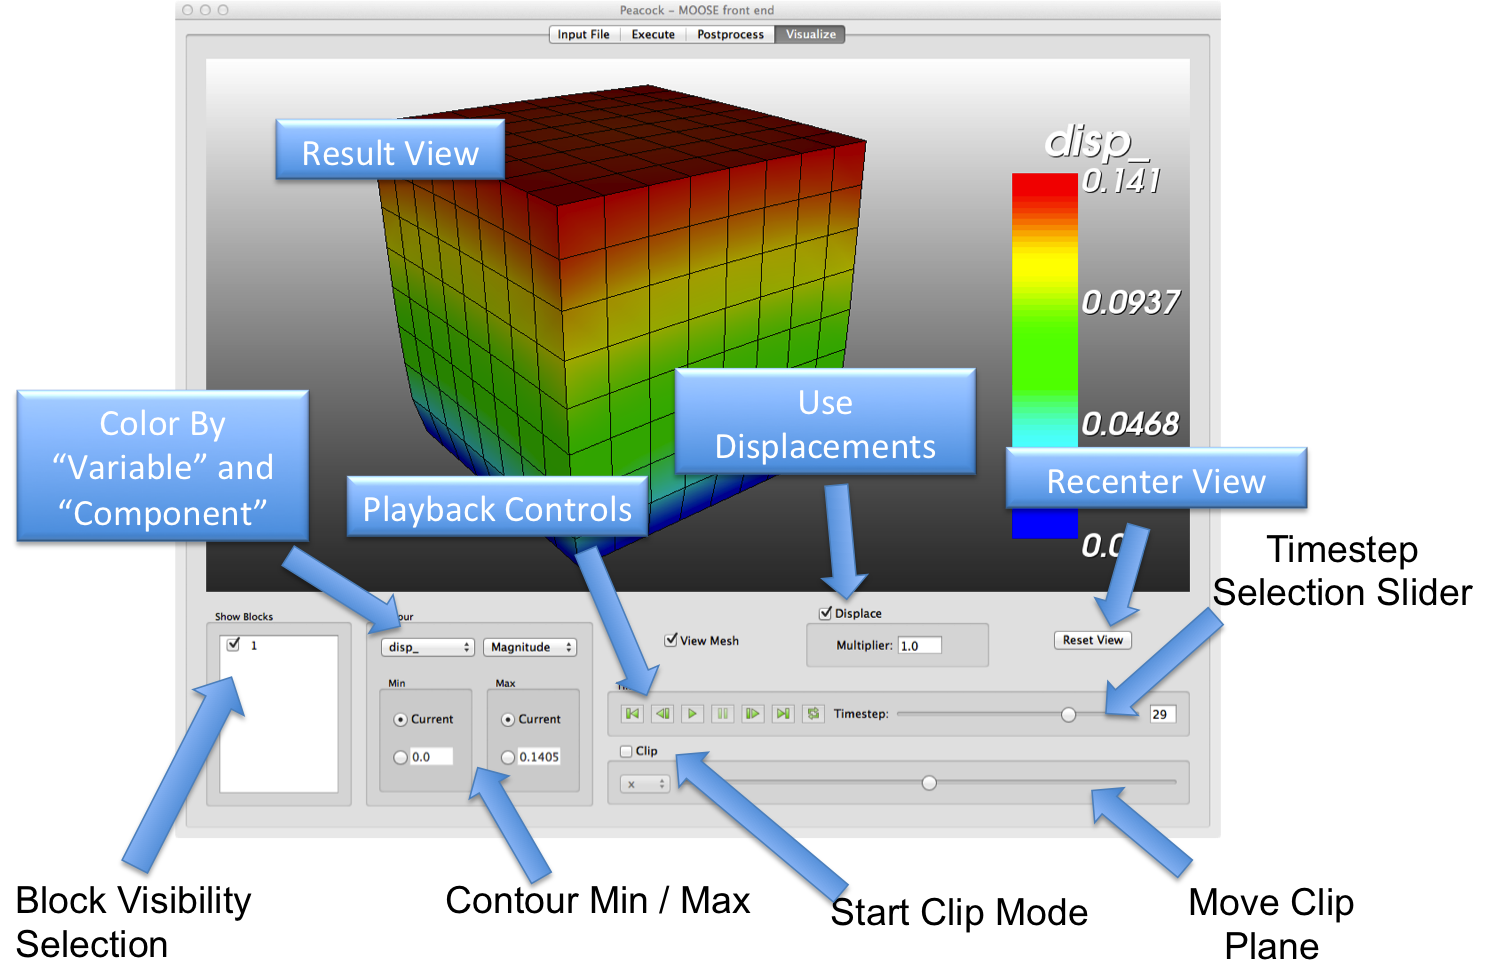
Result View
The main view on this tab is a 3D view of the result. Left-click and drag to rotate the result. Right-click and drag to zoom. Middle-click and drag or shift-left-click to pan.
Show Blocks
Check/uncheck blocks to show/hide them in the Result View.
Contour
Allows you to color the result by a variable. The drop-down menu in the top left allows you to select the variable. If the variable is a vector value (i.e. there is a sequence of variable names ending in _x, _y, _z) the other drop-down menu will be enabled, allowing you to select either a particular component or the Magnitude of the vector to use for coloring.
The Min/Max sections of the Visualize tab are for the legend minimum and maximum. There are currently two different options: Current and Custom. When set to Current, the min/max will update automatically with the min/max of the currently selected time step. The other option is a text box which allows manual input of custom min and max values. After editing the custom value, press the Enter key to use that value.
Options selected in the Contour section are stored by Peacock. If you set min/max to custom values those values will be remembered even if you select a different variable then come back to this one. Further, all of the contour options (including what variable is selected) will be maintained from run to run.
View Mesh
Shows the element edges in the mesh.
Displace
If a displacement vector is detected (generally variables named disp_x, disp_y and disp_z) this box will be selectable to enable movement of the mesh nodes by the displacement vector. The Multiplier box allows you to magnify the displacements by a scalar value. After entering a number, press Enter to use the new value.
Reset View
Centers the result in the Result view
Time
The time box allows selection of which time step to view. The time slider can be grabbed and moved left or right to go back and forth through time. The text box on the right side shows the currently selected time step number, edit this box and press Enter to jump to a particular time step.
The time slider works similarly to a scrolling UNIX terminal and Peacock's Execute tab. When the slider is all the way to the right, new time steps will be displayed automatically as they are written. If you move the slider to the left, the time step will remain fixed, and new results will simply be appended. Slide the slider back to the right to "re-attach" to the incoming results.
The "VCR Controls" give you the ability to step through the time steps and move to the beginning or the end. The Play button will go through all of the time steps. The "Loop" button will start play over again with the first timestep when the end is reached. Note that if you are playing in Loop mode, as new time step results are produced, they will be automatically added to the end of the list of time steps. Each time through, the animation will include the most recent results automatically.
Clip
Turn on "clip mode" to see "inside" the result. The slider will allow you to move the "clip plane" back and forth through the model. The dropbox selects which direction the normal vector is pointing in for the clip plane.
Troubleshooting
If Peacock fails to launch, you should first try the following steps:
Update your
moosecloneClean up any *.pyc files in the
mooseandpython/peacockdirectoriesRun Peacock again.
If you get the following error:
ImportError: No module named vtk
Then either you don't have VTK installed, or it's not installed correctly. Use the moose-peacock Conda package, or carefully compile your own. If you are using the moose-peacock package, chances are that your machine has other libraries being made available causing conflicts in ways Python errors can not detect. There are plenty of posts surrounding the subject on our Discussions site.